
The allure of a farmhouse sink, with its deep basin and apron front, transcends mere functionality to become a statement piece in any kitchen. Originating from a time when running water was a luxury, these sinks were designed for efficiency and practicality, offering ample space for washing large pots, pans, and even laundry. Today, they evoke a rustic charm that complements both traditional and modern kitchen designs, making them a coveted feature for homeowners seeking to blend style with utility.
Installing a farmhouse sink, however, is not a straightforward task. Unlike drop-in or undermount sinks, farmhouse sinks require precise preparation and installation. Their unique design demands modifications to cabinetry and countertops, and their weight necessitates proper support. This process can be daunting, but with the right tools, preparation, and guidance, it is entirely achievable for the dedicated DIY enthusiast or professional installer.
This guide aims to demystify the installation process, providing a step-by-step approach to ensure your farmhouse sink is not only a beautiful addition to your kitchen but also a functional one. We will cover everything from selecting the right sink for your space to the final touches that will make your sink installation a success. Whether you are renovating your kitchen or simply upgrading your sink, this guide will equip you with the knowledge and confidence to tackle the project.
Understanding Farmhouse Sinks
Farmhouse sinks, also known as apron-front sinks, have a storied history that dates back to the days before indoor plumbing. Originally designed for heavy use in farmhouses, these sinks featured a deep basin for accommodating large pots and pans, as well as providing ample space for tasks such as laundry and canning. This practicality, combined with their charming aesthetic, has led to a resurgence in popularity in both rural and urban homes.
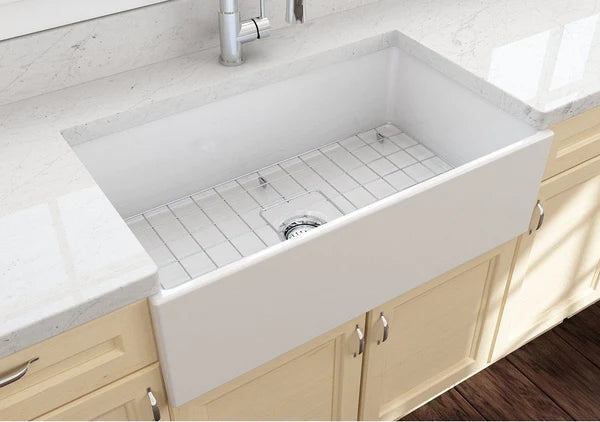
The defining characteristic of a farmhouse sink is its exposed front, which extends slightly beyond the edge of the cabinetry. This design not only adds to the sink's visual appeal but also reduces the strain of leaning over a counter to reach the basin. Farmhouse sinks are available in a variety of materials, including fireclay, stainless steel, copper, and cast iron, each offering its own benefits in terms of durability, maintenance, and style.
When choosing a farmhouse sink, it's important to consider the size and style that will best fit your kitchen's layout and design theme. Sizes range from compact 24-inch models suitable for smaller kitchens, to expansive 36-inch versions that make a dramatic statement in larger spaces. Styles can vary from the traditional white porcelain to modern and industrial metal finishes, allowing homeowners to find the perfect match for their decor.
Incorporating a farmhouse sink into your kitchen not only enhances its functionality but also elevates its overall design. The sink becomes a focal point, blending seamlessly with both contemporary and traditional elements.
Pre-Installation Preparation

Before embarking on the installation of a farmhouse sink, thorough preparation is crucial to ensure a smooth process and successful outcome. This preparation involves gathering the necessary tools and materials, accurately measuring your space, and making the required modifications to your kitchen cabinetry and countertop. Here's how to get started:
Tools and Materials Needed
First, compile a list of tools and materials you will need for the installation. This list typically includes a tape measure, pencil, jigsaw, drill, screws, silicone sealant, a level, and safety equipment such as gloves and goggles. Depending on the specific requirements of your sink and countertop material, additional tools like a circular saw for cutting through cabinetry or a stone cutter for granite countertops may be necessary.
Measuring and Choosing the Right Size Sink
Selecting the right size farmhouse sink is pivotal. Measure the width of your cabinet base to determine the maximum size of sink it can accommodate. Most standard cabinets are 36 inches wide, but it's important to verify this as farmhouse sinks are not one-size-fits-all. Additionally, consider the depth and height of the sink in relation to your existing countertop and cabinetry to ensure a comfortable and ergonomic setup.
Preparing Your Kitchen Space
Once you have selected your sink, prepare your kitchen space for installation. This often involves removing the existing sink and possibly cutting or modifying the cabinetry to fit the new sink's dimensions. Farmhouse sinks typically require a support frame within the cabinet to bear their weight, especially if you're choosing a heavy material like fireclay or cast iron.
Measure and mark the area of the cabinet that needs to be cut out, ensuring there's enough support left for the sink's weight. If your countertop needs to be cut to accommodate the apron front, ensure precise measurements to avoid gaps between the sink and the countertop. It's also a good time to consider any plumbing adjustments that may be needed to align with the new sink's drain position.
Proper preparation is the foundation of a successful farmhouse sink installation. By carefully selecting the right tools, measuring your space, and preparing your kitchen, you can avoid common pitfalls and ensure your new sink fits perfectly into its new home.
Step-by-Step Installation Process

Installing a farmhouse sink is a rewarding project that enhances the functionality and aesthetic of your kitchen. Follow these detailed steps to ensure a successful installation:
Removing the Existing Sink
Begin by turning off the water supply to your kitchen sink. Disconnect the plumbing, including the drain pipe and water supply lines. If you have a garbage disposal, ensure it's also disconnected. Carefully remove the existing sink from the countertop. This may require loosening clips or cutting through caulking around the sink. Once freed, lift the sink out of the countertop and set it aside.
Cabinet Modification
Farmhouse sinks require a supportive base cabinet due to their size and weight. Measure the dimensions of your new sink and compare them to the interior of your cabinet. You may need to remove the cabinet doors and cut out a portion of the cabinet face to accommodate the apron front of the sink. Use a jigsaw for precise cuts, following the measurements carefully to ensure a snug fit.
Additionally, construct a support frame inside the cabinet using 2x4s or the recommended material by the sink manufacturer. This frame should be strong enough to support the sink's weight and should be level to prevent any tilting or unevenness.
Sink Support and Reinforcement
After modifying the cabinet, focus on reinforcing the support for the sink. The support frame you've built should be securely attached to the sides of the cabinet and possibly the back, depending on the sink's design and weight. Check the level of the frame from front to back and side to side, making adjustments as necessary. It's crucial that the sink sits perfectly level to ensure proper drainage and to avoid any stress on the structure.
Installing the Farmhouse Sink
With the cabinet prepared and support frame in place, you're ready to install the farmhouse sink. Carefully lift the sink and position it within the cabinet opening, ensuring it sits securely on the support frame. If your sink is designed to sit slightly proud of the cabinet front, adjust its position accordingly. Once in place, check again that the sink is level.
Apply a bead of silicone sealant around the top edge of the sink where it will meet the countertop. This sealant helps to create a waterproof barrier and secures the sink in place. If your countertop material requires it, also apply a bead of adhesive under the sink's edges to bond it to the countertop securely.
Reattach the cabinet doors or front panel if it was removed or modified. You may need to trim these to fit around the new sink's apron. Finally, reconnect the plumbing, including the water supply lines and drain. Turn the water supply back on and check for any leaks in your connections. Make any necessary adjustments to ensure a tight, leak-free fit.
Installing a farmhouse sink involves careful preparation and attention to detail. By following these steps, you can ensure your sink is not only a beautiful focal point in your kitchen but also a functional and durable addition. Remember to consult the manufacturer's instructions for any specific requirements related to your sink model, and don't hesitate to seek professional help if you encounter challenges during the installation process.
Finishing Touches

After successfully installing your farmhouse sink, a few finishing touches will ensure its longevity and enhance its appearance. These steps are crucial for a watertight installation and to maintain the aesthetic appeal of your new kitchen centerpiece.
Sealing and Caulking
Apply a high-quality silicone caulk around the edges of the sink where it meets the countertop. This not only prevents water from seeping underneath the sink but also provides a clean, finished look. Be sure to smooth out the caulk with a caulking tool or a damp finger to remove any excess and ensure a neat seal. Allow the caulk to cure according to the manufacturer's instructions before using the sink.
Reconnecting Plumbing
Carefully reconnect the plumbing, ensuring that all connections are secure and leak-free. This includes attaching the water supply lines to the faucet and ensuring the drain assembly is properly connected to the sink's drain hole. It's advisable to replace old supply lines with new ones to prevent leaks. After everything is connected, slowly turn on the water supply and check for leaks. Tighten any connections as necessary to ensure a watertight seal.
Maintenance Tips
To keep your farmhouse sink looking its best, regular maintenance is key. For ceramic or fireclay sinks, avoid using abrasive cleaners that can scratch the surface. Stainless steel sinks benefit from occasional polishing with a product designed for stainless steel to remove water spots and maintain shine. Copper sinks will develop a patina over time, which is part of their charm, but can be cleaned with a mild soap and water if desired.
By taking these final steps, you ensure that your farmhouse sink not only looks beautiful but also functions flawlessly. Regular maintenance will keep your sink in top condition, making it a durable and stylish feature of your kitchen for years to come.
Common Installation Challenges and Solutions
Installing a farmhouse sink can present unique challenges. Being prepared for these potential issues can help ensure a smoother installation process.
Misalignment and Gaps
One common challenge is misalignment between the sink and the countertop or cabinet front, leading to unsightly gaps. To prevent this, double-check measurements before cutting any cabinetry and ensure the support frame is perfectly level. If gaps do occur, a high-quality silicone caulk can be used to fill them, ensuring a seamless appearance.
Inadequate Support
Farmhouse sinks, especially those made from materials like fireclay or cast iron, are significantly heavier than traditional sinks. Inadequate support can lead to sagging or, in extreme cases, damage to your cabinetry. Ensure the support frame inside the cabinet is constructed robustly and securely fastened to the cabinet sides. Consulting the sink manufacturer's guidelines for support requirements is crucial.
Plumbing Adjustments
The depth and placement of farmhouse sinks often necessitate adjustments to the existing plumbing. The drain may need to be lowered or the supply lines extended to accommodate the sink's position. Planning for these adjustments in advance can prevent last-minute trips to the hardware store. If you're unsure about making these changes, consider hiring a professional plumber to ensure a proper fit.
Conclusion: Installing a Farmhouse Sink
The installation of a farmhouse sink is a project that, while challenging, offers significant rewards in terms of both aesthetics and functionality. By carefully following the steps outlined in this guide, from preparation through to the finishing touches, you can ensure a successful installation that enhances the heart of your home. Remember, the key to a seamless process lies in meticulous planning, accurate measurements, and a little patience. With your new farmhouse sink in place, you'll enjoy a blend of rustic charm and modern convenience that will elevate your kitchen's design and usability for years to come.
Explore our exquisite collection of farmhouse sinks and find the perfect centerpiece to elevate your kitchen's style and functionality today!
Further Reading
For those interested in diving deeper into the world of farmhouse sinks, their installation, and maintenance, here are some valuable resources to explore:
- The History and Evolution of Farmhouse Sinks - Gain a deeper understanding of how farmhouse sinks have become a beloved feature in modern kitchens.
- Choosing the Right Material for Your Farmhouse Sink - This guide helps you navigate the pros and cons of different materials used in farmhouse sinks, ensuring you make an informed decision. Read more.
- DIY Farmhouse Sink Installation Guide - A comprehensive DIY guide for those looking to undertake the installation process themselves.